
Vessel Sink Installation: Sizing, Faucets and Drainage Guide

A vessel sink almost never fails because of the basin. It fails on the details around it — a faucet whose spout sits too close to the rim, a waste that does not match the basin’s overflow, a p-trap with nowhere to go under a shallow vanity, or a countertop that was never checked for load. Each of those is decided at specification stage, not on site, and each is far cheaper to fix on paper than after the countertop has been cut.
This guide is the installation half of vessel sink specification. It assumes you have already settled the format question: if you are still choosing between mounting types, start with our guide to choosing the right ceramic basin, and if your choice is between a raised basin and a flush one, read countertop vs undermount basin on a vanity first. What follows picks up after that decision and covers the number that most often derails a vessel sink installation: the clear space between the bowl rim and the water outlet.
Confirm the Vessel Format Before You Cut Anything
“Vessel sink” covers a wide family of shapes, and the shape drives every downstream decision — the cut-out, the waste position, the number of tap holes and the load on the counter. Before measuring, confirm which of the following formats your project is actually receiving.
| Format | Typical footprint | Where it is specified | Example in our range |
|---|---|---|---|
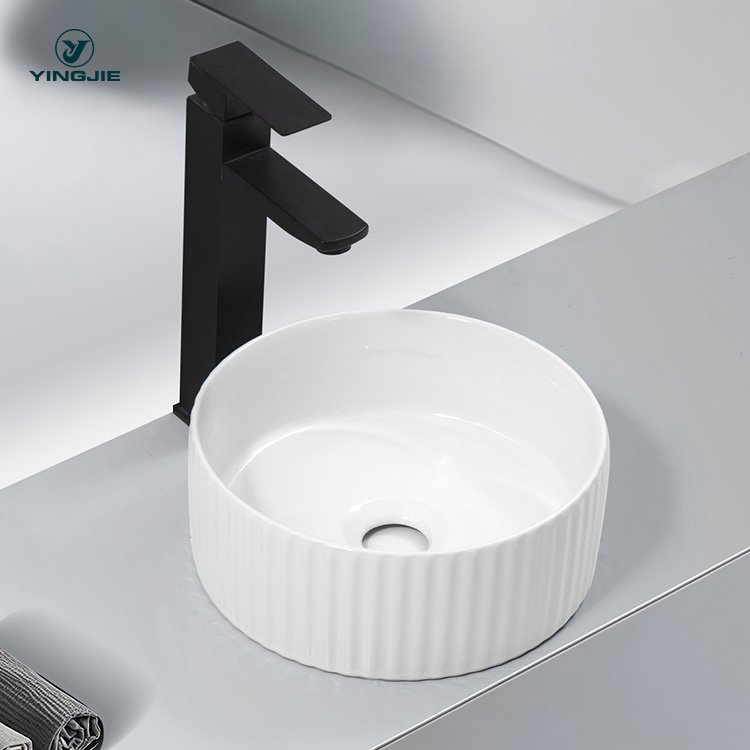
| Compact round vessel | 280–340 mm diameter, 110–130 mm deep | Guest toilets, ensuites, small apartments | Ribbed White Ceramic Vessel Sink — 280 × 280 × 110 mm |
| Round vessel | 380–420 mm diameter | Family bathrooms, hotel rooms | YJ-9848 Round Ceramic Vessel Sink |
| Square or rounded-square vessel | 390–420 mm | Contemporary residential, boutique hotels | YJ-9880 Square Ceramic Vessel Sink |
| Rectangular vessel | 480–560 mm | Double vanities, hotel standard rooms | YJ-9872 Rectangular Artificial Stone Basin 560 mm |
| Sculptural or organic rim | 380–520 mm | Design-led and hospitality feature bathrooms | YJ-9850 Sculptural Oval Ceramic Basin |

Two format families reach us most often in project enquiries: glazed ceramic and artificial stone. Both are supplied as countertop (vessel) basins and both install the same way, but they behave differently in one respect that matters for installation — artificial stone casts are moulded in resin and are typically slightly heavier and thicker-walled at the same footprint, which changes how the rim beds onto the counter. Our artificial stone basin range runs from 390 mm square to 560 mm rectangular, and each product page lists the outer dimensions you will need for the cut-out drawing.
Vessel Sink Sizing: The Three Measurements That Matter
Sizing a vessel sink is not one number. Three separate measurements decide whether the installed result looks right and behaves properly.
1. Bowl diameter against vanity width. The basin should not crowd the vanity top or the tap. A useful starting point is that the narrowest side of the basin should leave a comparable margin on both sides of the counter, so a 400 mm square vessel reads well on a 600–800 mm vanity, while a 500–560 mm rectangular vessel belongs on an 800–1000 mm top or a double-basin arrangement. If the vanity is narrower than the basin plus a reasonable margin on each side, the format is wrong — not the sizing.
2. Basin depth against wash height. This is the measurement buyers forget. A vessel basin raises the effective washing surface by its own depth, because the bowl sits on top of the counter rather than inside it. A deep bowl on a standard-height vanity can leave shorter users washing their hands above a comfortable level. When a project mixes vessel basins with flush-mounted basins on the same floor, check the standing height under each, not just the counter height.
3. Spacing between basin centres. For a double-vessel vanity, the distance between basin centres governs how the two users can work side by side, and it is fixed by the top, not by the basins. This has to be confirmed before the top is drilled, because moving a vessel basin afterwards means a new countertop.

Our published sizing reference for basins by room type — compact ensuites through hotel standard rooms, including the minimum spacing between basin centres for dual installations — is in the ceramic basin selection guide. Use it to fix the size, then come back to this page for the installation sequence.
Vessel Sink Installation: The Four Steps in Order
Vessel basins are the simplest of all basin formats to install, provided the four steps are done in the right order. Doing step three before step two is the single most common cause of a re-cut counter.
Step 1 — Dry-fit and mark before anything is cut
Set the basin on the counter in its final position and mark the outline. Confirm three things while the basin is loose: that the outline clears the counter edge on all sides, that the basin does not obstruct the tap lever or the mirror line, and that the waste hole can sit directly above the trap. Marking from the actual basin rather than from a drawing catches dimensional tolerance between pieces — casting and firing move ceramic by a millimetre or two, which matters on a tight counter.
Step 2 — Cut only what the format requires
A vessel basin does not need a basin cut-out. The counter needs only the waste hole and, if the tap is deck-mounted, the tap hole. This is the main practical advantage of the format, and it is why vessel basins install on counter materials that cannot be undermounted. Keep the hole size matched to the actual waste and tap being supplied, not to a generic dimension — mismatched hole sizes are a common cause of returned hardware.
Step 3 — Bed and seal the rim, and leave a service line
Bed the basin on a continuous bead of sanitary-grade silicone. Two details decide whether this ages well:
- Keep the bedding consistent all round. A partial bead lets water track under the rim, which is the source of the dark line that appears at the base of poorly installed vessel basins.
- Leave a serviceable joint. A permanently rigid adhesive bond, or a full seal to the outer edge, makes the basin very difficult to remove for a waste replacement without risking the counter. A clean silicone bead, tooled flush, is both watertight and removable.
Wipe the bead, check the alignment once more, and leave the basin undisturbed until the sealant has cured — moving it while curing breaks the seal invisibly.
Step 4 — Waste, trap and final level
Fit the waste and connect the trap, then check level in both directions. A vessel basin that is level at the rim but sitting on an unlevel counter will pool water at one side of the bowl, which is a complaint that cannot be resolved by adjusting the waste. If pooling appears, the counter is the problem.
Faucet Selection: Where Most Vessel Installations Fail
This is the part of the specification that gets least attention and causes most of the problems. A vessel basin raises the bowl, so a standard deck-mounted tap that works perfectly on a flush basin will not clear the rim of a vessel basin — and a tap whose spout reaches just over the rim will throw water against the back of the bowl and up the wall.
Three properties have to be checked together:
- Spout height. The outlet has to sit comfortably above the rim of the basin in use, not level with it. As a working rule, the higher the bowl, the more spout height the tap needs, and the more critical the tap’s aerator becomes in controlling splash.
- Spout reach. Height alone is not enough. A tall tap with a short reach delivers water close to the back wall of the bowl, which increases splash-back behind the basin. Reach should carry the outlet past the rim and towards the centre of the bowl.
- Flow control. Higher outlet plus higher flow equals more splash. A tap with an aerator, or a lower-flow cartridge, behaves far better over a vessel basin than a high-flow tap at the same height.
Wall-mounted versus deck-mounted. A wall-mounted tap solves the height problem cleanly because it is set at whatever height the wall allows, and it leaves the counter free of tap holes — useful where the counter is stone and you want to minimise drilling. The trade-off is that the tap position is fixed before the basin is on site, so the reach has to be right first time. Deck-mounted taps are more forgiving to change later, but they add tap holes to the counter and limit how much height you can achieve.
Because the correct spout height depends on the depth of the specific bowl, our product team confirms the recommended tap clearance for each model on request — send the model number and we will return the figure that matches it, rather than a generic recommendation that may not suit your basin.
Drainage and Overflow: Matching Waste to Basin
Waste and overflow are specified together, and a mismatch is only discovered after the basin is sealed in place.
- Overflow or no overflow. Vessel basins are supplied in both configurations. A basin with an overflow needs a slotted waste so the overflow channel drains; a basin without an overflow needs an unslotted waste so the bowl cannot drain below the fitting. Fitting an unslotted waste to a basin with an overflow leaves the overflow permanently wet and prone to staining; fitting a slotted waste to a basin with no overflow leaves an open path for water to seep under the basin.
- Waste outlet size. Sanitary ware uses two common nominal waste outlet sizes, and the market determines which applies: the smaller outlet is standard in much of Europe and the UK, the larger in North America and Australia. Confirm the outlet size against the market’s plumbing standard before ordering, because the trap has to match the waste, not the other way around.
- Pop-up versus free-flow. Pop-up wastes are convenient but add a rod or cable mechanism that has to clear the underside of the counter. On a shallow vessel arrangement, the mechanism can foul the trap. Where access underneath is limited, a free-flow waste is the lower-risk specification.
- Trap clearance. The trap needs vertical space below the waste. A vessel basin sits on top of the counter, so its waste sits higher than a flush basin’s, which usually helps trap clearance — but only if the vanity is deep enough front-to-back for the trap body and its fall. Check the trap against the vanity interior before fixing the counter, not after.
Countertop Load and Support
A vessel basin concentrates its weight over the counter opening rather than spreading it across the top, and larger stone basins are heavy. That changes the structural check.
- Confirm the counter’s cut-edge support. The cut for a vessel basin is small relative to an undermount opening, which works in your favour, but the material around the waste hole still carries the basin’s load through the rim contact.
- For solid-surface and stone tops, confirm the minimum thickness the top supplier allows for a point-loaded fitting, and confirm that the top is supported under the basin position rather than spanning unsupported.
- For wall-hung vanities, the load path runs through the wall fixings as well as the counter. A heavy vessel basin on a cantilevered vanity adds to the fixing load, so the fixing specification has to be checked for the basin, not just for the cabinet.
- For timber and laminate tops, the counter can carry a vessel basin because there is no cut-out to seal — but confirm the finish resists standing water at the rim line, since vessel basins spill over the edge more often than flush formats.

Packing and Transit: Vessel Basins Ship Differently
Because a vessel basin projects above the counter, it is exposed in transit in a way a flush basin is not — the rim and outer wall are unsupported by any surround. For project buyers, three checks on the packing specification reduce arrival damage:
- Rim protection, not just corner protection. The vulnerable zone is the rim edge and the outer wall, so the protective layer has to cover the full circumference of the rim rather than only the corners of the carton.
- No rim-to-rim contact within the carton. Basins packed face to face transfer impact directly into the rim. Internal dividers or individual foam wrapping prevent it.
- Mixed-model loading plan. Vessel formats from 280 mm to 560 mm do not stack interchangeably. Ask for the loading plan by model rather than by total quantity, so a heavy rectangular basin is not crushed under lighter stock.
Vessel Sink Installation Checklist for Trade Buyers
Take this list to the RFQ, not to the site:
- Format, outer dimensions and the exact model number of the basin
- Confirm whether the basin has an overflow — and specify the matching slotted or unslotted waste
- Waste outlet size required for the destination market
- Tap type: wall-mounted or deck-mounted, with the required spout height and reach
- Counter material, thickness and the minimum thickness allowed for a rim-loaded basin
- For wall-hung vanities, the fixing specification including the basin load
- Whether the tap holes and waste hole are cut in the factory or on site
- Packing specification for rim protection, and the loading plan by model
- Certification documents required for the destination market
- Quantity and delivery date, checked against our standard MOQ of 50 pcs per model and a production lead time of 25–35 days after approval
Sending that list with the enquiry produces a quotation that includes the fittings the project actually needs, instead of a price for the basin alone and a second round of questions afterwards.
Frequently Asked Questions
Q: What is the most common mistake in vessel sink installation?
A: A tap that is too short or too close to the bowl. A vessel basin raises the washing surface, so a standard deck-mounted tap that suits a flush basin often does not clear the rim, and a spout that only just reaches over the rim throws water against the back of the bowl. Specify tap height and reach against the bowl depth, not against the counter.
Q: How do I know whether my vessel basin needs a slotted or unslotted waste?
A: Check whether the basin has an overflow. A basin with an overflow needs a slotted waste so the overflow channel can drain; a basin without an overflow needs an unslotted waste so the bowl cannot drain below the fitting. Fitting the wrong type causes either a permanently wet overflow or water seeping under the basin.
Q: Does a vessel sink need a cut-out in the countertop?
A: No. A vessel basin sits on the counter, so the top needs only a waste hole and — if the tap is deck-mounted — the tap holes. That is why vessel basins can be fitted to counter materials that cannot be undermounted.
Q: Can I install a vessel sink on a wall-hung vanity?
A: Yes, provided the fixing specification accounts for the basin load as well as the cabinet. A raised basin puts its weight on the counter around the waste hole, and a cantilevered vanity transfers that load into the wall fixings, so the fixings have to be sized for the combined load.
Q: What tap height do I need for a vessel sink?
A: It depends on the bowl depth, because the outlet has to sit comfortably above the rim while still reaching towards the centre of the bowl. Send us the model number and we will confirm the recommended clearance for that specific basin rather than give a generic figure that may not suit your format.
Q: Do you supply the waste, trap or tap with the basin?
A: The basin is supplied with the holes cut to the configuration you specify. Waste, trap and tap are specified separately against the destination market’s plumbing size, which is why we ask for the market and the tap type at quotation stage.
Q: What is the minimum order quantity and lead time for vessel basins?
A: Standard MOQ is 50 pcs per model, with a production lead time of 25–35 days after sample approval and deposit confirmation. Mixed-model container orders are accepted above that threshold.
Conclusion
Vessel sink installation is decided by four measurements taken before the counter is touched: the bowl footprint against the vanity, the waste size against the overflow, the trap against the vanity depth, and — above all — the tap spout height and reach against the bowl depth. Get those right and a vessel basin is the easiest basin format to install, because there is no cut-out to seal and the basin can be replaced without disturbing the counter. Get the tap wrong and no amount of on-site adjustment will fix the splash.
If you are specifying a vessel sink for a project, send us the model, the destination market and your tap arrangement — our team will confirm the matching waste, recommended spout clearance and packing specification for your order, along with factory-direct pricing and certification documents for your market.